🔄 Last updated: April 13, 2026
Setting up an inventory management system for a small retail store doesn’t have to cost $39 a month. I set up Zoho Inventory in my grocery store on one Saturday afternoon — after a 45-minute detour caused by a CSV format mistake — and built a free expiry alert system that most guides say requires a paid plan. Here’s the complete setup, including the workaround I spent 2 days building. lets dive in zoho inventory setup small retail
Zoho inventory setup small retail — Step-by-Step Guide (2026)
Free Tier + Python Workaround • Real Store Screenshots • Windows & Mac • Works Globally
⚡ Quick Overview
My Rating
Forever free plan
Saved per week
Setup time
📚 Table of Contents
The Saturday Afternoon I Almost Quit Zoho
I opened Zoho Inventory for the first time on a Saturday afternoon with the store closed. My laptop was on the counter, I had a chai, and I thought this would take an hour.
The dashboard hit me like a warehouse management system built for a company with 50 employees. Purchase orders. Bills. Contacts. Integrations. Currency conversions. I sat there for ten minutes just clicking through menus trying to find where to add a product.
Then I tried to import my product list. I had it in Excel. I exported it as CSV and uploaded it. Zoho rejected the entire file. Wrong column format. I reformatted it and tried again. Rejected again. Different error this time. Vishal walked past, saw my face, and offered tea. I took it.
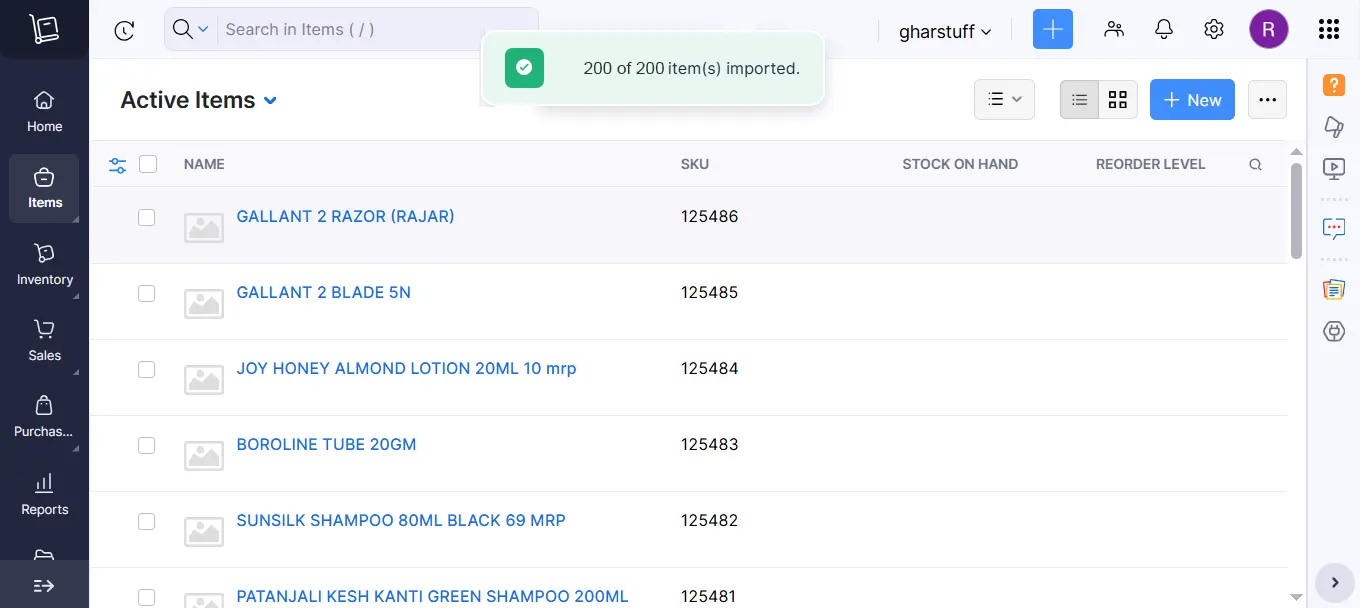
45 minutes later — after downloading Zoho’s CSV template, reformatting my product list to match it exactly, and uploading it a third time — it worked. 200 products imported in 30 seconds.
That first week, the stock management system caught 23 items I would have missed. A paneer batch expiring in 5 days. Milk packets pushed to the back of the shelf. Bread that wasn’t moving. Everything flagged.
✅ The honest summary: Setup took 2 hours including my CSV mistakes. If you follow this guide exactly, you’ll do it in 90 minutes. I also spent 2 additional days building a free expiry alert system that Zoho normally charges $39/month for — I’m giving it to you in this guide.
👤 I’m Rahul Saini, grocery store owner in Hisar running gharstuff.com. I’ve tested this inventory tracking system on 1,200+ SKUs for over 60 days. I only write about tools I actually use in my store.
This guide is the Essential-Only workflow. You don’t need 90% of Zoho’s features. You need stock tracking, reorder points, and expiry monitoring. That’s it. I’ll show you exactly where to find each one — including the free workaround for automated expiry alerts.
I’ve been using this stock management system for 6 months in my store. It helped me cut food waste by 35% and save $180 a month — I documented the full results in my food waste reduction guide. This article is about the setup itself.
Why the Free Tier Is More Than Enough for Small Retail
Before we get into setup, let me address the question every store owner asks: is the free plan actually useful or is it just a teaser for paid features?
I’ve been on the free plan for 6 months. I haven’t needed to upgrade. Here’s exactly what you get:
| Feature | Free Plan | Standard ($39/mo) |
|---|---|---|
| Orders per month | 50 | 500 |
| Users | 1 | 2 |
| Warehouses | 2 | 2 |
| Stock tracking & reorder points | ✅ Yes | ✅ Yes |
| Expiry tracking (manual method) | ✅ Yes | ✅ Yes |
| Automated batch tracking alerts | ❌ Paid only | ✅ Yes |
| Free Python alert workaround | ✅ Guide below | N/A |
| Mobile app + barcode scanning | ✅ Yes | ✅ Yes |
| Basic reports | ✅ Yes | Advanced |
| Cost | $0 forever | $39/month |
The free plan limit that matters most is 50 orders per month. For a small grocery store, an “order” in Zoho means a purchase order you create to record new stock from a supplier. If you’re ordering from 5 suppliers and placing 2 orders each per month — that’s 10 orders. Well under the limit.
The 1-user limit means only your login can use the full account. Your staff can use the mobile app for scanning — that’s different from the user account limit. I’ll explain this in Step 6.
💡 My rule: Stay on the free plan until Zoho has already saved you enough money to cover the $39/month Standard plan. For most small stores, that takes 2-3 months of waste reduction savings.
If you want to see how Zoho compares against other small business inventory software, read my complete comparison of the 7 best AI inventory tools for small retail.
What You Need Before You Start
- A laptop or desktop — setup is much easier on a full screen. Phone works but you’ll spend extra time navigating small menus.
- Your product list in any format — paper notebook, Excel file, WhatsApp notes, anything. You’ll convert it to CSV during setup. I’ll give you the exact template.
- One Saturday afternoon — no customers, no interruptions. 90 minutes minimum, 3 hours if you have a large product list.
- Your supplier names — you’ll add at least 2-3 during setup. Just the name is enough to start.
That’s genuinely all you need. No barcode scanner. No special equipment. No technical background required for the basic setup.
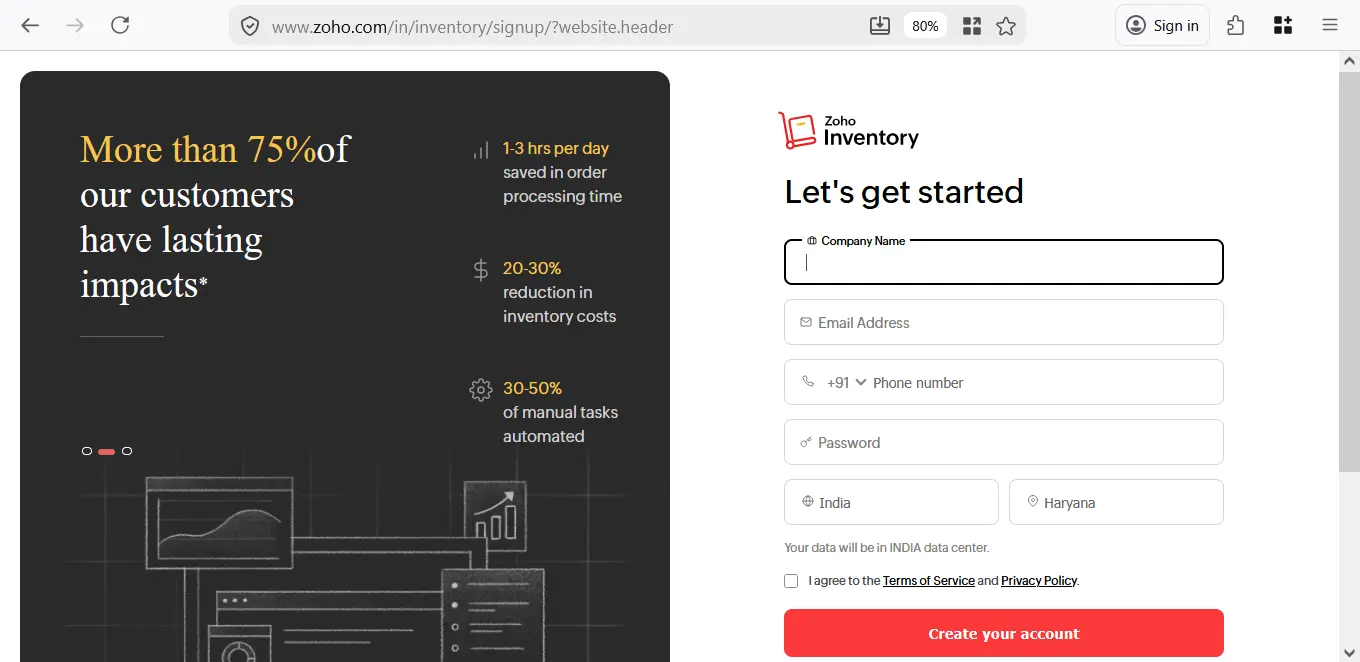
Step 1 — Create Your Free Zoho Inventory Account
Go to zoho.com/inventory — not zoho.com.
💰 New user bonus
Sign up through this link and get $100 in Zoho Wallet credits — use them toward any Zoho subscription. Free plan stays free. Credits apply if you ever upgrade.
Try Zoho Inventory Free → Get $100 CreditsThe main Zoho page will try to sell you Zoho One, which is a bundle of 40+ apps at $105/month. You don’t need that. Go directly to the Inventory page.
The free plan details are listed on Zoho’s official pricing page — confirm current limits before signing up as pricing can change.
Click Get Started for Free. Enter your email and create a password. Verify your email before continuing.
After verification, Zoho asks which region to store your data. If your customers are in the US, UK, or AU — select United States. If you’re in India like me and your audience is local, select India. This affects where your data is stored and cannot be changed later.
⚠️ Common mistake: Many people search “Zoho free inventory software” and land on Zoho One or Zoho Books instead of Zoho Inventory. Make sure the URL says zoho.com/inventory and the page specifically mentions inventory management, not accounting.
Step 2 — Set Up Your Organization
After logging in, Zoho walks you through organization setup. Here’s what actually matters and what you can skip:
| Field | What to Enter | Important? |
|---|---|---|
| Organization name | Your store name | ✅ Yes |
| Industry | Retail | ✅ Yes |
| Currency | Your local currency (INR, USD, GBP, AUD) | ✅ Yes — can’t change later |
| Time zone | Your local time zone | ✅ Yes — affects alerts |
| Financial year start | April (India) or January (US/UK) | ✅ Yes |
| Tax settings | Skip for now | ❌ Set up later |
| Logo upload | Skip | ❌ Not needed |
The currency setting is the most important. Set it correctly now — Zoho does not let you change your base currency after setup without creating a new organization. I use INR and convert manually in my articles.
Step 3 — Import Your Products the Right Way
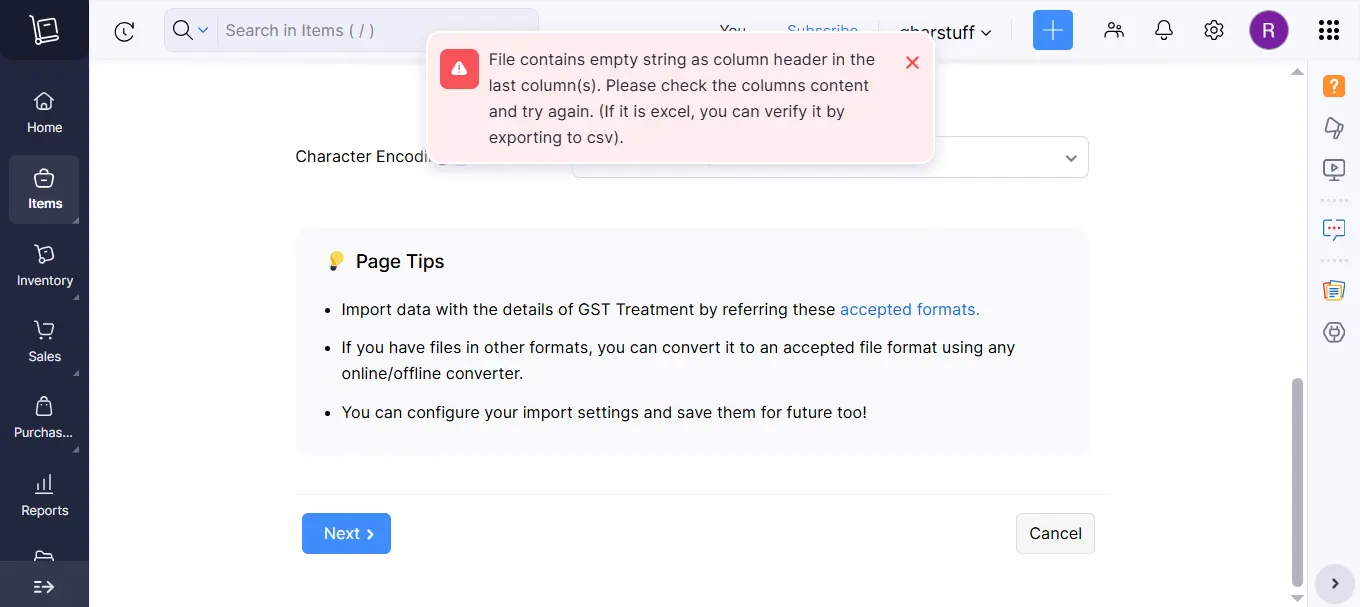
This is where I lost 45 minutes. Don’t repeat my mistake.
Zoho has a specific CSV format for its stock management system. If your columns don’t match exactly — wrong header name, wrong order, extra columns — the import fails with a vague error message. I tried twice with my own format before I found the fix.
The Fix — Download Zoho’s Template First
In Zoho Inventory go to Items → Import Items → Download Sample File. This gives you the exact CSV format Zoho expects. Open it, fill in your products, save as CSV, upload. First time, every time.
| Column | What to Enter | Example |
|---|---|---|
| Item Name | Product name | Full Cream Milk 500ml |
| SKU | Your product code | MILK-FC-500 |
| Unit | How you sell it | pcs |
| Selling Price | Price you sell at | 45 |
| Purchase Price | What you pay supplier | 38 |
| Opening Stock | Current quantity | 24 |
| Item Type | Inventory (not Service) | Inventory |
Start With Your High-Risk Products Only
Don’t try to import your entire store in one go. Start with your perishables — dairy, bread, vegetables, any product that expires within 30 days. Your first import should be 30-50 high-risk items. Salt, sugar, packaged biscuits, cooking oil — add these later.
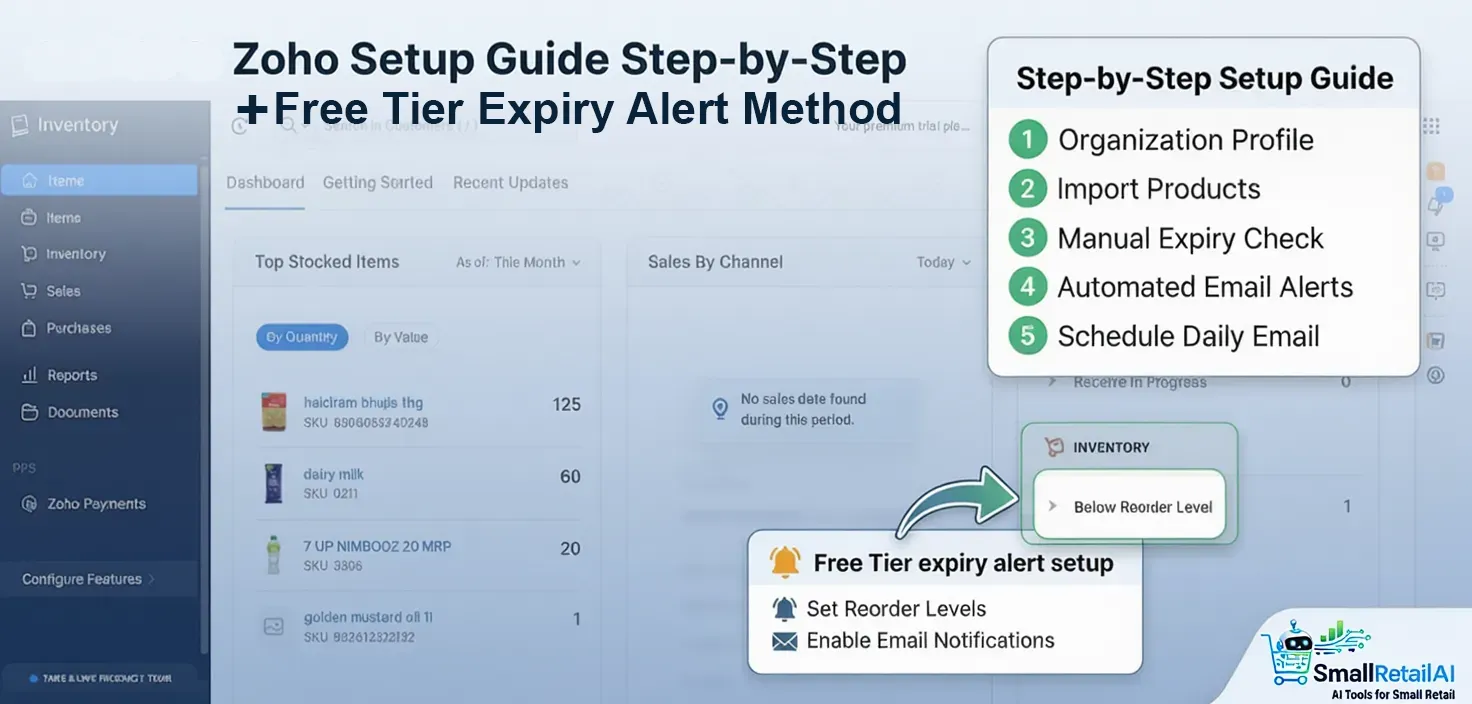
Step 4 — Set Up Expiry Date Tracking
This is the section every other Zoho guide gets wrong. Most will tell you automated expiry alerts require the Standard plan at $39/month — and they’re right about native batch tracking. But after 2 days of research and testing, I found a completely free workaround using Zoho’s API. I’ll give you both options.
✅ What I built: A free Python script that connects to your Zoho account via the API, checks expiry dates you’ve entered as Custom Fields, and emails you an alert every morning. Works on Windows and Mac. Works in India, US, UK, AU — everywhere. Total cost: $0.
First — Add Expiry Dates to Your Products (Required for Both Methods)
Both methods below rely on expiry dates stored in Zoho as a Custom Field. Set this up first:
- Go to Settings → Preferences → Items
- Click Field Customization tab
- Click + New Custom Field
- Label: Expiry Date | Data Type: Date
- Show when creating transactions: Yes
- Include in Modules: Purchase Receives
- Click Save
Now when stock arrives, go to Items → product → Edit → scroll to bottom → fill in the Expiry Date field → Save. Vishal does this in 30 seconds per product using Google Lens to read the date off the packet.
Optional but useful: Go to Items → click the small settings icon left of the Name column → Customize Columns → search Expiry Date → enable it. Now expiry dates are visible in your main product list at a glance.
✅ Path A — Manual Method
Best for: Non-technical store owners
Setup time: 5 minutes
Daily time: 2 minutes
No Python. No API. Just Zoho’s built-in Advanced Search used cleverly every morning.
🤖 Path B — Automated Method
Best for: Anyone willing to do a one-time setup
Setup time: 1-2 hours (once only)
Daily time: 0 minutes
Daily email alert sent automatically. Dashboard app to manage all tracked items.
Path A — Manual Expiry Check (No Code Required)
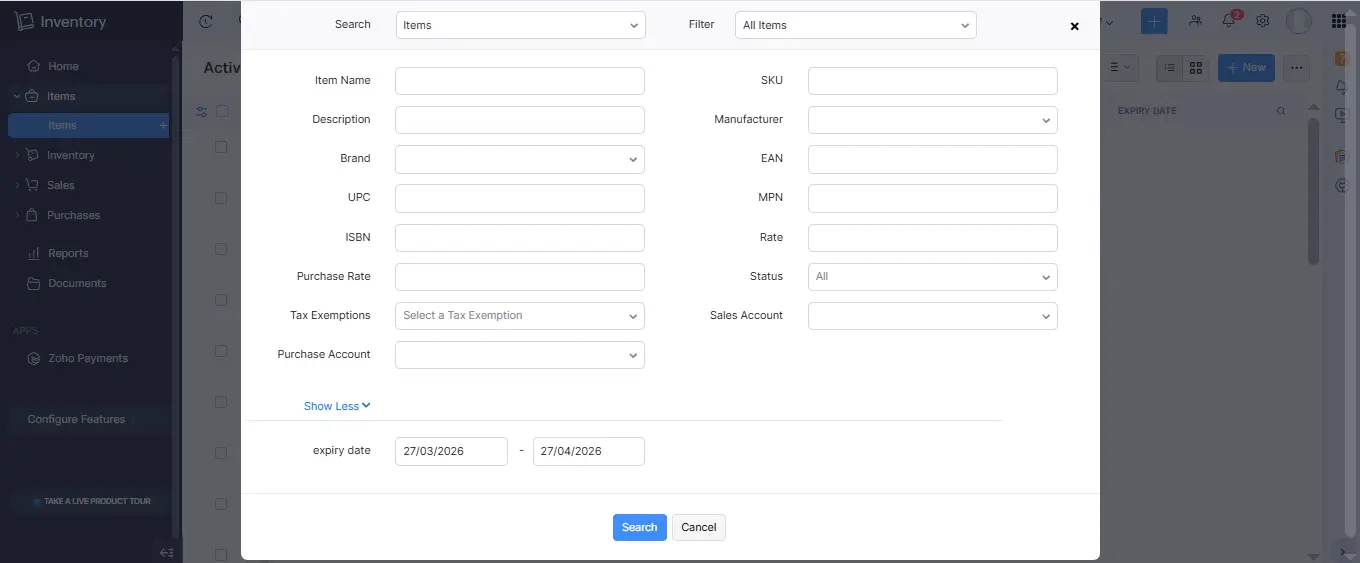
This takes 2 minutes every morning. The trick is Zoho’s Advanced Search — which most store owners never find.
- Go to Items in the left menu
- Click the search/lens icon at the top left
- Select Advanced Search at the bottom of the dropdown
- Scroll down and click Show More
- In the Expiry Date fields — enter today’s date in the first field and a date 7 days from now in the second field
- Click Search — every item expiring within 7 days appears instantly
Make this part of your opening routine — same as switching on the lights. Anything that appears goes to the front of shelf or the discount shelf depending on days remaining.
Path B — Automated Daily Email Alerts (Free Python Solution)
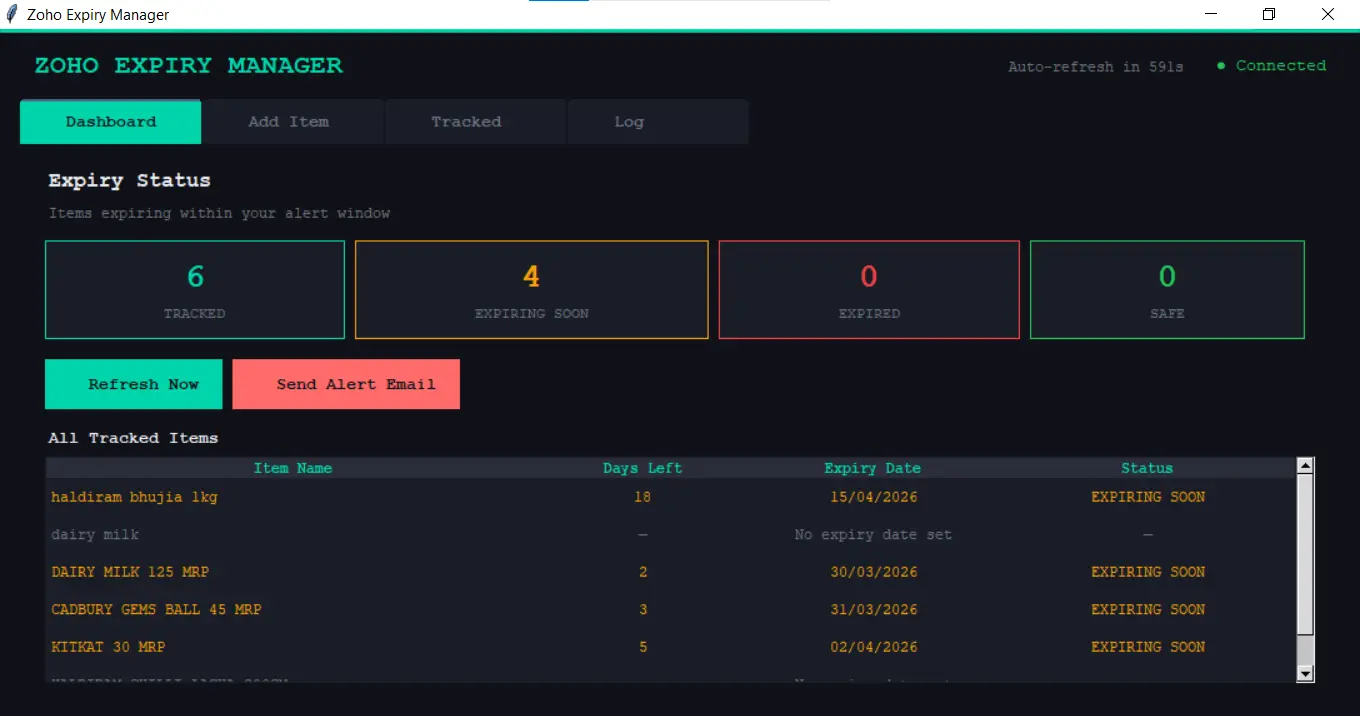
I built this after discovering that Zoho’s native expiry alerts require a paid plan. It took 2 days. You get the same result as $39-99/month of Zoho features for free — a daily email every morning listing everything expiring within your chosen window, plus a desktop dashboard to manage everything visually.
I also put together a full list of free AI tools that work alongside Zoho — ChatGPT, Google Sheets, and a few others that fill the gaps the free plan leaves.
⚠️ Who this is for: This requires installing Python on your computer and setting up Zoho API credentials — a one-time setup of 1-2 hours. If that sounds uncomfortable, use Path A. Both are completely free and both work.
What You Get With Path B
| Feature | What It Does |
|---|---|
| Daily Email Alert | Emails you every morning with items expiring within 30 days (adjustable) |
| Dashboard App | Color-coded — 🟢 Safe / 🟡 Expiring Soon / 🔴 Expired |
| Add Item Tab | Search Zoho products by name and add to tracking with one click |
| Tracked Tab | All tracked items with days remaining. Remove items easily |
| Works globally | India, US, UK, EU, Australia, Japan — change 2 URLs in the script |
| Missed schedule | If your PC was off, it runs the moment you turn it on |
| Cost | $0 — completely free |
How It Works
→ Checks which items expire within your alert window (default 30 days)
→ Sends email via Zoho Mail SMTP → Email arrives in your inbox
→ Fully automated. Runs daily. Zero manual effort after setup.
Setup — 6 Parts, One-Time Only
| Part | What You Do | Time |
|---|---|---|
| Part 1 | Create Zoho Custom Field (already done above) | 5 min |
| Part 2 | Get Zoho API credentials (Client ID, Secret, Refresh Token, Org ID) | 15 min |
| Part 3 | Install Python on your PC or Mac | 10 min |
| Part 4 | Download files, paste in folder, fill in credentials | 10 min |
| Part 5 | Run the desktop app — add your products to tracking | 15 min |
| Part 6 | Schedule daily email (Windows Task Scheduler or Mac launchd) | 10 min |
Part 2 — Get Your Zoho API Credentials
- Go to api-console.zoho.in (India) or api-console.zoho.com (US/UK/AU)
- Click Add Client → Self Client → Create Now
- Copy your Client ID and Client Secret — save in a text file
- Click Generate Code tab → Scope:
ZohoInventory.FullAccess.all→ Duration: 10 minutes → Click Create - Copy the grant code immediately — it expires in 60 seconds
- Open CMD (Windows) or Terminal (Mac) and run:
-d “code=YOUR_GRANT_CODE” \
-d “client_id=YOUR_CLIENT_ID” \
-d “client_secret=YOUR_CLIENT_SECRET” \
-d “redirect_uri=https://www.zoho.com/inventory” \
-d “grant_type=authorization_code”
// US/UK/AU: replace accounts.zoho.in with accounts.zoho.com
- From the response, copy and save your refresh_token permanently. It never expires. Treat it like a password — never share it.
- Go to Zoho Inventory → Settings → Organization Profile → copy your Organization ID
⚠️ Security note: Your refresh token gives full access to your Zoho account. Never share it publicly, never put it in a public GitHub repository, and never send it over email. Store it only in a local text file on your own computer.
Parts 3 + 4 — Install Python and Set Up Files
Windows: Download Python from python.org/downloads. Check “Add Python to PATH” before installing. Then open CMD as Administrator: pip install requests
Download Python from python.org/downloads — always use the latest stable version.
Mac: Open Terminal: python3 --version to check. If not installed: brew install python3 then pip3 install requests
Download the free Python files package from the download section below. Place all three files in a folder called ZohoAlert. Open each .py file in Notepad (Windows) or TextEdit (Mac) and fill in your 6 credentials:
CLIENT_SECRET = “your_client_secret”
REFRESH_TOKEN = “your_refresh_token”
ORG_ID = “your_org_id”
YOUR_EMAIL = “your_zoho_email”
YOUR_ZOHO_PASSWORD = “your_zoho_password”
ALERT_DAYS = 30 // change to 7, 14, or any number
Part 5 — Run the Desktop App
python C:\ZohoAlert\zoho_expiry_manager.py
// Mac:
python3 ~/ZohoAlert/zoho_expiry_manager.py
The dashboard opens. Go to Add Item tab → search your product → select → click + Add Selected Item to Tracking. The Dashboard tab immediately shows everything color-coded — green, yellow, or red.
Part 6 — Schedule the Daily Email
🪟 Windows — Task Scheduler
- Win + R → type
taskschd.msc - Click Create Basic Task
- Name: Zoho Expiry Alert
- Trigger: Daily → set your time
- Action: Start a Program
- Program:
python| Arguments:C:\ZohoAlert\expiry_alert.py - Finish → Right click → Properties → Settings → check “Run task as soon as possible after a scheduled start is missed”
🍎 Mac — launchd
- Open Terminal
- Run:
nano ~/Library/LaunchAgents/com.zohoexpiry.plist - Paste the plist content from the downloaded guide
- Save: Ctrl+X → Y → Enter
- Run:
launchctl load ~/Library/LaunchAgents/com.zohoexpiry.plist
✅ Once scheduled: Every time you turn on your PC or Mac — even if it’s noon, even if you missed the scheduled time — the script runs and emails you any expiry alerts for that day. Zero manual effort from this point forward.
Using Outside India — Change 2 URLs
| Region | Auth URL in script | API URL in script |
|---|---|---|
| India | accounts.zoho.in | www.zohoapis.in |
| US / Canada | accounts.zoho.com | www.zohoapis.com |
| Europe | accounts.zoho.eu | www.zohoapis.eu |
| Australia | accounts.zoho.com.au | www.zohoapis.com.au |
| Japan | accounts.zoho.jp | www.zohoapis.jp |
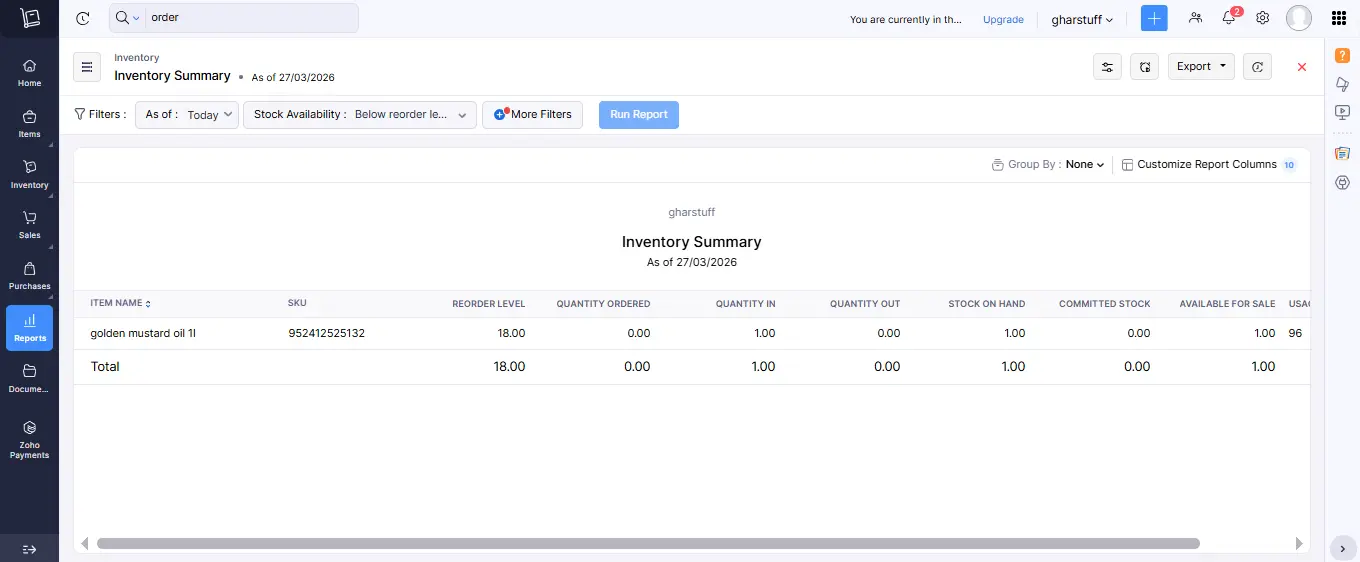
Step 5 — Set Reorder Points
Reorder points tell Zoho: when stock falls below X units, alert me. No more telling a customer “sorry, we’re out” because you forgot to order.
I cover the full reorder point formula and results in my stockout guide → stockout reduction system
To set a reorder point: go to Items → click any product → Edit → Reorder Point. Enter the number. Save.
How to Calculate Your Reorder Point
Example — Full Cream Milk 500ml:
Average daily sales: 8 packets
Lead time from supplier: 1 day
Safety stock: 5 packets
Reorder Point = (8 × 1) + 5 = 13 packets
When stock hits 13 → Zoho alerts you to order more.
Start with your top 5 fastest-moving products. Add more as you get comfortable. For seasonal products, adjust reorder points before the season — Zoho lets you edit any time in 30 seconds.
Step 6 — Add Your Staff
The free plan allows 1 user account — that’s you. But your staff can still use Zoho through the mobile app for scanning without needing their own full account.
Download the Zoho Inventory app on your staff member’s phone. Log in with your account credentials. Your staff now has access to scan barcodes, check stock levels, and update quantities — all on the phone they already own.
The 10-Minute Morning Routine
- Open Zoho dashboard — check expiry alerts (Path A search or Path B email)
- Check reorder alerts — anything below the reorder point?
- If delivery arrived — scan new stock into system using mobile app
- Move any 3-day expiry items to the discount shelf
- Done. 10 minutes. Back to running the store.
⚠️ Important: If you upgrade to the Standard plan ($39/mo), you can add a second user with limited permissions — Vishal gets his own login without access to financial reports or settings. On the free plan, one shared login is the workaround. Make sure staff know not to change any settings.

Common Mistakes I Made — So You Don’t Have To
❌ Mistake 1 — Wrong CSV Format
I tried to upload my own Excel export without downloading Zoho’s template first. It failed twice. Always download Zoho’s sample CSV, fill that in, and upload it. 30 seconds versus 45 minutes lost.
❌ Mistake 2 — Notification Fatigue
I set 14-day expiry alerts for everything. Email was full by day 3. Staff started ignoring them. Fix: 7-day alerts for fresh produce, 3-day alerts for dairy, no alerts at all for products with more than 60-day shelf lives.
❌ Mistake 3 — Importing Too Many Products at Once
I tried to import all 800 SKUs in week 1. Start with 30-50 high-risk perishables. Get the system working on those first. Add more products weekly.
❌ Mistake 4 — Giving Staff Full Access
On the free plan this is unavoidable — one shared login. When you upgrade, give warehouse staff access only — they can scan and update stock but can’t see margins or change settings.
❌ Mistake 5 — Tracking Non-Perishables Too Early
Salt, sugar, cooking oil, packaged biscuits have 6-12 month shelf lives. Setting expiry alerts for them in week 1 adds noise with no value. Add non-perishables after the first month.
Hidden Settings Only a Real Owner Knows
📸 Add Photos to Products
Vishal can’t read SKU codes well. But he can match photos. Take photos of your products and upload them to Zoho. Staff will find and scan items faster with zero confusion about which product is which.
📦 Safety Stock for Seasonal Products
During festival season — Diwali, Eid, Christmas — increase your safety stock in reorder points by 20-30%. Zoho doesn’t know your local holidays. You do. Take 10 minutes before every major season to update your top 10 products.
🤖 Combine With ChatGPT for Order Forecasting
Every Monday morning, export your last 4 weeks of sales from Zoho and paste them into ChatGPT with the prompt from my food waste guide. Zoho gives you the data. ChatGPT tells you how much to order. Together they replaced 8 hours of manual guesswork per week.
Free vs Paid — When to Actually Upgrade
Most small grocery stores will never need to upgrade. I haven’t after 6 months. But here’s when you’ll know it’s time:
Sign up Free → Get $100 Credits if you upgrade later
| Upgrade When… | Plan | Cost |
|---|---|---|
| You exceed 50 purchase orders/month consistently | Standard | $39/mo |
| You need staff to have their own login | Standard | $39/mo |
| You want native automated expiry alerts without Python | Standard or Professional | $39–99/mo |
| You need advanced sales reports | Standard | $39/mo |
| You manage 2+ warehouses or locations | Standard | $39/mo |
| You need ecommerce integration (Shopify etc.) | Professional | $99/mo |
The honest math: if Zoho saves you $63/month in waste reduction — my number after 60 days — the Standard plan at $39/month pays for itself and leaves you $24 ahead. By the time you need to upgrade, you’ll be in profit either way.
The free plan is a genuine forever-free plan — not a 14-day trial. You will not be charged, your account will not be downgraded, and your data will not be deleted if you stay on the free plan.
Free Download: Setup Checklist + Python Files
📥 Free Download: Zoho Setup Checklist + Expiry Alert Python Files
Everything I built for my own store. The checklist makes sure you don’t miss any setup step. The Python files give you automated expiry alerts without paying for a plan upgrade.
What’s included:
- ✅ Zoho Setup Checklist — 6-step checklist, nothing missed
- 📊 CSV Product Template — correct format, fill in your products
- 🐍 Python Expiry Alert Files — expiry_alert.py + zoho_expiry_manager.py + full setup guide. Windows and Mac. Works globally.
- 📋 Daily Waste Log — track everything that goes in the bin
- 🤖 5 ChatGPT Prompts — Monday morning order forecasting
- ✅ Staff Daily Checklist — print and give to Vishal
Enter your email to get instant access:
👉
Submit and Get Instant Access To Our Full Download Repository Right Away.
Free. No credit card. Instant access after email confirmation.
Real Results After zoho inventory setup small retail
These are the numbers from my store after 60 days of running this inventory tracking system:
| What I Measured | Before Zoho | After 60 Days | Change |
|---|---|---|---|
| Monthly waste cost | $180 | $117 | 35% reduction |
| Inventory hours per week | 12 hours | 4 hours | 67% less |
| Stockouts per month | 11 | 3 | 73% fewer |
| Near-expiry items caught | ~2/week | ~14/week | 7x more |
| Order accuracy | ~60% | ~85% | 25% better |
The full story behind these numbers — including how I combined Zoho with ChatGPT and Google Sheets — is in my food waste reduction guide. The setup in this article is what made those results possible.
FAQs About zoho inventory setup small retail
Q1: Do I need to be technical to set up Zoho Inventory?
A: No. The basic setup — account, organization, product import, reorder points — requires no technical skills. If you can use WhatsApp and basic Excel, you can do it. The only technical step is the Python expiry alert setup (Path B), which is optional. Path A gives you manual expiry tracking with no code at all.
Q2: How long does setup actually take?
A: Account creation and organization setup: 20-30 minutes. Product import: 1-2 hours for your first 30-50 items. Reorder points for top 5 products: 15 minutes. Path A expiry tracking: 5 minutes. Path B automated setup: 1-2 hours one-time. Total for basic setup: one Saturday afternoon.
Q3: What if I have more than 1,000 SKUs?
A: The free plan’s 50-order limit refers to purchase orders per month, not your total product count. You can have far more than 1,000 products in the system. Start with your 30-50 highest-risk perishables and add more over time regardless of your total SKU count.
Q4: Can I use Zoho Inventory without internet?
A: No. Zoho is cloud-based and requires internet to sync. The mobile app may cache some data briefly offline, but all updates, alerts, and real-time stock data need an internet connection. For stores with unreliable internet, keep a Google Sheets backup — the template is in the free download.
Q5: Is the free tier really free or will I be charged later?
A: Zoho’s free plan is a genuine forever-free plan — not a trial. You will not be automatically charged and your account will not be downgraded. I’ve been on it for 6 months without any charge. Upgrading to Standard ($39/mo) requires you to explicitly choose to do so.
Q6: The Python setup sounds complicated. Is there a simpler way?
A: Yes — that’s Path A. Use Zoho’s Advanced Search every morning to filter items by expiry date. Takes 2 minutes. No Python, no API, no code. The Python setup (Path B) is optional and only needed if you want fully automated email alerts without any manual checking.
Q7: Will I lose my data if I switch plans or stop using Zoho?
A: Your data stays in your account regardless of plan. If you stop using Zoho entirely, export everything first — Zoho lets you export all products, orders, and reports as CSV or PDF. Do this before closing your account. Never assume cloud data is permanent.
Q8: What about sales tax setup for US and UK stores?
A: Zoho handles tax in the Settings section. US stores can configure state-level sales tax. UK stores can configure VAT. Indian stores have GST built in. I didn’t cover tax setup in this guide because it varies by location — Zoho has country-specific documentation that covers your local rules. Set it up after your core inventory system is running.
Your Move — Set It Up This Weekend
Best AI Inventory Tools Compared
Four things to do this Saturday:
- Download Zoho’s CSV template first — fill in your 30 highest-risk products before you even create the account. Have it ready.
- Create your account at zoho.com/inventory — not the main Zoho page. Set currency and timezone correctly. Cannot be changed later.
- Set up Path A first — add the Expiry Date custom field, run your first Advanced Search, and immediately see what’s expiring. Takes 5 minutes and works from day one.
- Set up Path B if you want full automation — download the Python files from below, fill in your credentials, schedule the daily email. One-time 2-hour setup, then it runs itself every day.
The first time you run the Advanced Search and see a list of products expiring this week — products you would have completely missed — that’s the moment you’ll know the setup was worth it.
Haven’t read how I used this system to cut food waste by 35%? That’s the real-world results guide: How I Reduced Food Waste by 35% in My Small Grocery Store Using Free AI Tools.
Want to compare Zoho against other small business inventory software before committing? Read my 7 Best AI Inventory Tools for Small Retail — 60-day real test.

About the Author
Rahul Saini
Grocery store owner in Hisar, India, running gharstuff.com since 2019 with 800–1,200 SKUs daily. I test AI tools in my real store — with real staff, real customers, and real consequences when something doesn’t work. Every number on this site is from my actual store.
Read My Full Story →Related Articles
Last updated: March 2026. Zoho Inventory pricing verified March 2026: Free plan forever free, Standard $39/mo, Professional $99/mo. Author: Rahul Saini, grocery store owner and founder of SmallRetailAI.com.
Questions about your specific setup — Windows, Mac, India, US, UK? Ask in the comments. I read every one.